
HF:Getting Started Guide (Simple Ledger)
From BGL Wiki
Contents |
BGL Client Centre
The BGL Client Centre provides you with a direct connection to BGL. It is recommended that you register with the Client Centre as soon as you purchase the software.
At the Client Centre you can:
- view your client details
- log a support call
- monitor the status of current support calls and mark them as resolved
- modify the problem of logged calls
- view the problem and resolution details of your past calls
- view the consultant allocated to solving your problem
- view BGL announcements
- view and pay subscription invoices
- register for training courses, user groups and update seminars
- register for BGL functions
- book a call-back time for your support calls
- access BGL Wiki
- access BGL Forum
- download PDF copies of Training Manuals
- provide feedback to BGL
- add or vote for enhancements to the software using the Wishlist system
How to Register for the Client Centre
- From an Internet browser, go to the following web address - http://clients.bglcorp.com.au/
- Click on Register on the left menu.
- Input the following information :
- Administration Contact Email (previously provided to BGL)
- Product ID
- Username (create your own)
- Password (create your own)
Note: For direct access to the BGL Client Centre from Simple Ledger, save your username and password in Administration | Defaults | Connectivity.

Contacting BGL
BGL can be contacted via:
- Street Address : Suite 2, 606-608 Hawthorn Road, East Brighton VIC Australia 3187
- Phone:
Australia +61 3 9530 6964 / 1300 654 401 Hong Kong 800 933 545 New Zealand 0800 444 488 Singapore 800 616 2148 UK 0800 028 3491
- Fax: +61 3 9530 6964
- Email:
[email protected] [email protected] [email protected] [email protected] [email protected]
BGL Support
You can receive assistance from BGL using the following methods:
BGL Wiki
- BGL Wiki can be accessed from Simple Ledger by clicking on
 from Help and Web Access | Web Access. All BGL Help resources, including Help Files, Training Manuals, Knowledge Base Articles and Release History are online on BGL Wiki.
- Help Files within Simple Ledger can be accessed from any screen by clicking on
 .
.
Logging a Support Call
You can log a support call in the following four ways:
- Directly from Simple Ledger by clicking on
 from Help and Web Access | Web Access. You must ensure your BGL Client Centre username and password has been saved in Administration | Defaults | Connectivity.
- Via the BGL Client Centre
- Live Chat calls via the BGL Client Centre
- Via Telephone on 1300 654 401
Software Updates
To ensure Simple Ledger automatically advises you of all Updates, you must set up an Auto Update Notification within the software in Administration | Defaults | Connectivity.

All installation and updates must be completed on the server. You must first ensure you can access the program from the server before accessing it from a workstation.
Updates can be downloaded from the BGL Client Centre. Detailed instructions can also be accessed from the BGL Client Centre.
Logging into Simple Ledger
- Simple Ledger must be installed on the server and networked to a workstation. You must first ensure you can access the program from the server before accessing it from a workstation.
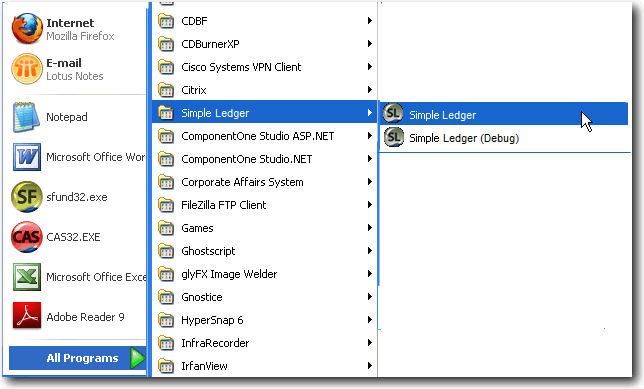
- To log in to Simple Ledger
- Click Start | All Programs | Simple Ledger and select the Simple Ledger logo to log in to the program.
- Create a desktop shortcut on a workstation
 and click on this shortcut to open Simple Ledger.
 - Select Supervisor and click OK. By default, there is no password for the Supervisor user.


Note: A password can be added to the Supervisor user after you have logged in to Simple Ledger. Refer to the Creating New User topic for more information.
Simple Ledger Conventions
Keyboard shortcuts
Simple Ledger uses standard windows shortcut keys:
| Keyboard Shortcut | Use |
|---|---|
| CTRL+C | Copy |
| CRTL+X | Cut |
| CTRL+V | Paste |
Simple Ledger has its own shortcut keys should you prefer to use the keyboard rather than the mouse. Some common shortcuts used throughout Simple Ledger:
| Keyboard Shortcut | Use |
|---|---|
| ALT+N | Creates a new record |
| ALT+E | Edits the current record |
| ALT+S | post or saves the current data |
| ALT+X | exits the current screen without saving |
All shortcut keys can be accessed when right clicking any record in any screen in Simple Ledger.

Alternatively, shortcut keys are referenced on each Simple Ledger button with an underlined character. For example, the Calculate GST shortcut key from the Reports screen is ALT+U ![]()
Simple Ledger Icons
Every screen in Simple Ledger contains common icons and fields as well as screen specific icons.
Some common icons that are accessible throughout Simple Ledger screens:
| Icons | Use |
|---|---|
|
Click to Exit Screen | |
|
|
Click to Select Record |
|
|
Click to Add New Record |
|
|
Click to Edit Record |
|
|
Click to Delete Record(s) |
|
|
Click to Save |
To easily identify each icon and field, hover your mouse pointer on the icon or field to display a yellow bubble hint.

For quick data entry, the following conventions can be used in any Simple Ledger screen:
- Hit the Tab key on the keyboard to skip to the next field
- Hit the Enter key on the keyboard to pre-fill fields with the details from the last transactions
Simple Ledger Main Screen
The Simple Ledger Main Screen has four key regions:

Simple Ledger Menu
The Simple Ledger menu ![]() is located at the top left hand corner of the main screen and displays the common command functions for Simple Ledger. The button provides quick access to recently used items, help and explorer functionality.
is located at the top left hand corner of the main screen and displays the common command functions for Simple Ledger. The button provides quick access to recently used items, help and explorer functionality.

Ribbon Toolbar
The Ribbon Toolbar provides access to all Simple Ledger processes. The ribbon provides complete access to all Simple Ledger screens and processes. The ribbon has been organised in tabs that follow a fund administration process. These tabs simplify access to the more advanced Simple Ledger features and modules

Simple Ledger Explorer
The Simple Ledger Explorer has eight shortcut icons to commonly used screens in Simple Ledger. Click on icons to access the screens.

Refer to the Welcome to Simple Ledger Help File on BGL Wiki for more information.
Creating a New User
From the Ribbon Toolbar:
On the Administration tab, in the Setup group, click User Maintenance

Click ![]() to add a new user.
to add a new user.

| User Name | Input the user's login name. |
| Password | Input password to have additional security for the user. Password is optional, leave password blank to enable user log in without password. |
| User Level | Select the access rights required by this user from:
Supervisor - this level of access allows users to access all areas of Simple Ledger User (Non Admin) - this level of access allows users to access all screens except for the Administration functions |
Click ![]() to create new user.
to create new user.
Selecting a Ledger
From the Ribbon Toolbar:
On the Ledger Data Input tab, in the Ledger group, click Ledger Selection.

Highlight a ledger and click on ![]() Select.
Select.
The selected fund code and name will appear on the of the Simple Ledger Main screen.

Once a ledger has been selected, ledger specific screens and fields can be accessed from the Ribbon Toolbar or the Explorer screen.
Chart of Accounts
Simple Ledger contains a range of accounts already set up in the Master Chart of Accounts. Simple Ledger users will only need to add new investment sub accounts when new investments are purchased.
To access the Chart of Accounts:
From the Ribbon Toolbar:
On the Fund Data Input tab, in the Listings group, click Chart of Accounts

There are eight account types, which are:
- Trading Income
- Cost of Goods Sold
- Income
- Expense
- Tax Allocation
- Capital
- Assets
- Liabilities
The account ranges as pre-defined in the Ledger Details | Account Ranges tab will determine the type of each account. It is recommended that these default account ranges are not changed.
The Chart of Accounts can be sorted by account ranges by clicking on the drop down arrow next to Type.

For more information on the Chart of Accounts, refer to the Help File on Simple Ledger Chart of Accounts on BGL Wiki.
For more information and instructions on creating accounts, refer to Lesson 3 of Simple Ledger Training Manual.
Transaction Types
From the Ribbon Toolbar:
On the Ledger Data Input tab, in the Processing group, click Transactions

There are four transaction types in Simple Fund. These are:
 Bank Statements
 Payments
 Receipts
 Journals
Refer to Simple Ledger Transactions Help Files for more information.
Entering Transactions
Transactions can be entered from the Transaction screen.
From the Ribbon Toolbar:
On the Ledger Data Input tab, in the Processing group, click Transactions
Click ![]() ,
, ![]() ,
, ![]() ,
, ![]() or
or ![]() according to the transaction type to add new transaction. Refer to Lesson 5 and Lesson 6 of Simple Ledger Training Manual for more information. Transactions will be added as journals.
according to the transaction type to add new transaction. Refer to Lesson 5 and Lesson 6 of Simple Ledger Training Manual for more information. Transactions will be added as journals.
- Purchase
- Income Received
- Expenses Payable
- Dividend/Distribution Reinvestment
- Journals
Additional transactions can also be added by clicking ![]() Additional Functions. The following transactions can be added:
Additional Functions. The following transactions can be added:
- Bonus Issue
- Consolidation
- Subdivision/Split
- Return of Capital
- Demerger
Reports
The Reports screen can be accessed:
From the Ribbon Toolbar:
On the Ledger Data Input tab, in the Processing group, click on Reports

The Reports screen allows you to prepare various documents and reports. Reports are divided to different tabs. Reports that can be prepare under each tabs are:
Ledger Reports
| Financial Reports
| Investment Reports
| Depreciation Reports
|
Toolbars
The Financial Reports screen contains two general toolbars.

Printing, Previewing and Exporting Documents
To view a document before printing, click ![]() Preview to the left of the document name.
Preview to the left of the document name.
To change the number of printed copies, input a number between 0-9 next to the document name. To clear the documents selected, click ![]() Clear.
Clear.
To print all documents selected, click ![]() Print.
Print.
To export documents to PDF, Word or Excel, click on the appropriate icons - ![]() Export to PDF,
Export to PDF, ![]() Export to Word or
Export to Word or ![]() Export to Excel
Export to Excel